And also Final Assembly... Woo Hoo!!!
but more on that later... first:

number of pieces: 29 (plus 58) and also 148... plus 18... huh?
Waste HST's to collect: 56 plus 8 big guys (plus 10)
Don't worry, I have a plan for those big guys!
So here we go!!! Month 12... You did it! you are SO THERE!
How's my cheering?? I'm going to stay really optimistic for you guys... mainly because, if you've made it this far, you seriously rock!! but also because month 12 has a TON of steps.
Step 1.) Make your block and two baskets like usual.... Yes, I know, we really should have added this to another month, but hey, I'm writing the build along... not the pattern!
Pretty easy one... fitting really since everything comes down to and waits for this block, the very center of your entire quilt top!
Make your flying geese, half square triangles, and 9 patch center. Assemble!
You guys are pro's at this now!

Step 2.) Make your LAST TWO BASKETS!!!! LAST TWO!!!! YAY!!!!

Now's when it gets interesting. We see next to make two more blocks... Cool.

Then we see next to make two more blocks.... Cool.

Wait, what?...... aren't these blocks EXACTLY the same?!
Technically, yes..... but for whatever reason the FABRICS/colors used are not the same.
If you are super particular and want to follow the pattern exactly, follow the instructions provided on the TWO SEPERATE patterns to identify the different fabrics used.
If not, who cares..... cut four blocks from the first pattern set using whatever colors you want for the little floating triangle geese guys and let's move on!

Note: You DO really want the bottoms of these blocks to be the red and black... You'll see in a minute why.

Great, good talk.... So make the blocks, flying geese, half square triangles... etc. You guys are pro's now, remember!
We now... officially have.... (drumroll, please)
ALL of our blocks necessary to complete the top!!!! (I seriously need a confetti cannon)
🎉🎉🎉🎉🎉
that'll have to do I guess....
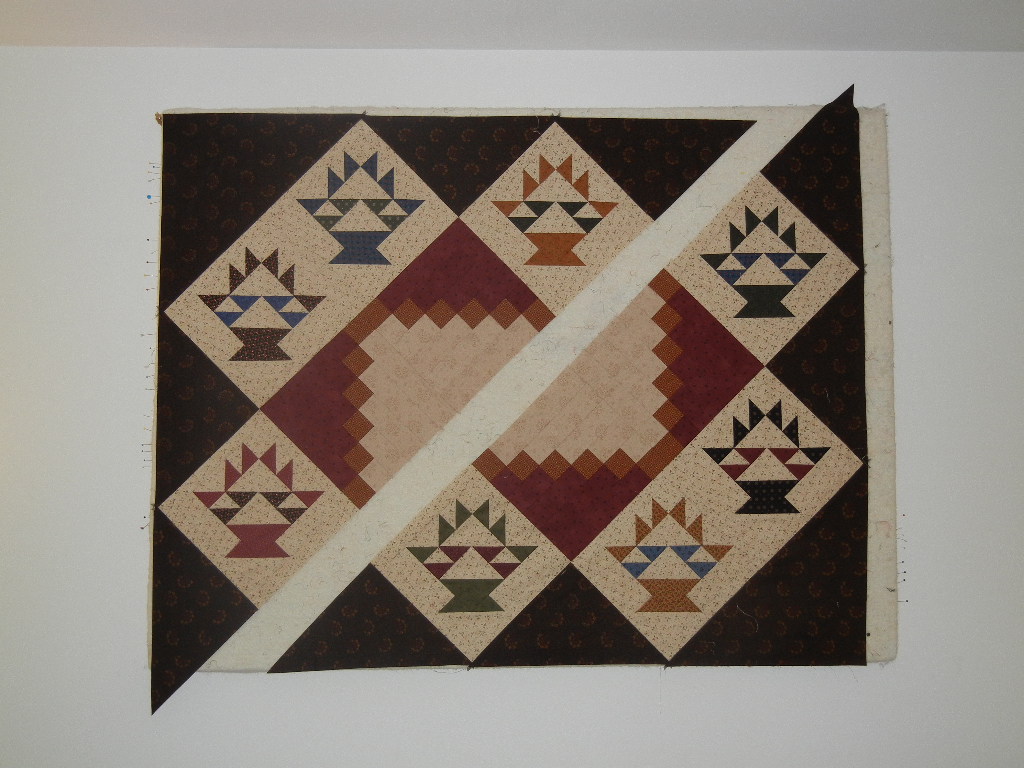
Anyway, you can now see what the center will look like!
Here are all the blocks up on my board... You see why the red in the middle was so important???
Note: Don't start sewing these together quite yet.... I just wanted to show you a taste of what it will look like.... We are going to sew the blocks together in rows.

Wait...... those can't be the same blocks... They don't look even remotely the same!
.................
Look again! I usually have to turn my head to one side to see it, but they are all there! They are all turned a bit wonky, but that's so we can set them in on point!!
Don't panic, it's EXACTLY like sewing straight rows.... well.... sorta.
Ok... Begin by cutting out your setting triangles as instructed.... the black ones.
We are going to start with the corners. Everything on point revolves around the corners.... Basically, you need to add the necessary materials to create straight rows to sew... See, I told ya... exactly the same! Ha Ha....
Note: Your pattern provides EXACT placement for every single basket... If you kept track of which one you made in what month.
If you didn't, again.... who cares?!.... place them wherever you want! It's a really scrappy quilt. I personally do not feel like it will matter at all!

So here's the corner..... but to figure out what to sew, let's turn our heads a bit to locate the rows.

Do you see it now???
Two baskets on their sides, triangles on either side.
A triangle, a basket, two setting blocks, a basket, a triangle.
Ok, assemble your little rows... but before you put the rows together, make sure you are lining them up working from the center, out... Meaning, find the seams that need to go together and line those up first. (you could even pin them!) DO NOT start sewing if the black triangle on the edge is not hanging over by at least a quarter of an inch!!!
This will indicate a problem. Either you aren't lined up right, or your triangle could be cut wrong.
(no worries, right!? This is just like the way we pieced our baskets.)
We are going to make only two of our corners this way... you'll see why.

If you lose your rows, just turn your head a bit....

We currently have top left, and bottom right done.... yes!
Ok... now is when it got a little tricky for me. The rows are HUGE! I couldn't fit them on my board anymore, so I started to lay them on my bed.
Be sure as you are going along to pay attention to which block is where... or... not! It's a sampler. No one will know but you if one is out of place, right?!
The only ones that matter are the red/beige blocks from month 2 and 3... These HAVE to be turned the right way or you will lose the effect... and also, the center blocks... Those kinda make the whole center pop!
The pattern... in black and white... shows the "lines" for the red/beige blocks. DON'T FOLLOW THE LINES ON THE PATTERN!!!
Instead, look at your colors and make sure the red will be to the outside, and the beige to the center.
Alright, so refer to your original photo for block placement and lay them out in rows.
Keep building out from the two corners we've made.
Remember to line up our seams from the center of the rows, out.

Ok... so as you are building the middle section, you will come to a point where your "row" is not entirely complete. There just isn't a way to sew the last black triangle on to the right!
You have reached the "middle"
This is the point where you will need to add the top right triangle and bottom left triangle AFTER your rows are sewn together.
I know it's a bear... I know there is a TON of material to move.... It really helps to have a table or chair set up to the left of your machine to help "hold" all the extra materials you are pushing through.
Hang in there... you are almost done!!

After your three "sections" are together all you have left to do is borders and you're done!!!!
I ended up with a bit extra on the border fabrics, so I opted to cut my side borders a bit wider than the top and bottom. I don't think it changed the look at all... just made it a bit wider. Mine finished at 98" wide instead of 95"
Here's what I cut:
from the red: (5) at 2" for top and bottom (6) at 3" for the sides
from the black: (5) at 3.75" for top and bottom, (6) at 5.25 for the sides.
These measurements were based on what I had left over to use.... Feel free to make your strips wider if you'd like, but be sure to allow yourself enough fabric for your binding!!!
We do still have plenty of the black fabric available HERE if you would like to alter the borders wider than what it calls for... or wider than what you have left to use.

It's a big one!!! it barely fit on my wall.... Lol... It's going to look great on your bed though!!!!
Congratulations!!! Give yourself a pat... or a high five... YOU DID IT!!!
If you are looking to use your left over scraps from this project, I hope you will consider my pattern!
There is also, a project called "Wagon Ruts" that is included with your pattern set. That would be a great option too!!
I hope I've encouraged you all to play with your triangles though... Use different sizes! Add some squares! Try adding Rectangles!!! You just never know what kind of cool block you can come up with!
Leave me a comment and let me know how I did on my first build along... AND SHOW ME SOME PHOTOS OF YOUR QUILTS!!!!
If you haven't already, follow us on Facebook HERE for more tips and ideas from Your Quilt Shop.
Thanks, guys.. It truly has been a pleasure!
Don't worry, I have a plan for those big guys!
So here we go!!! Month 12... You did it! you are SO THERE!
How's my cheering?? I'm going to stay really optimistic for you guys... mainly because, if you've made it this far, you seriously rock!! but also because month 12 has a TON of steps.
Step 1.) Make your block and two baskets like usual.... Yes, I know, we really should have added this to another month, but hey, I'm writing the build along... not the pattern!
Pretty easy one... fitting really since everything comes down to and waits for this block, the very center of your entire quilt top!
Make your flying geese, half square triangles, and 9 patch center. Assemble!
You guys are pro's at this now!

Step 2.) Make your LAST TWO BASKETS!!!! LAST TWO!!!! YAY!!!!

Now's when it gets interesting. We see next to make two more blocks... Cool.

Then we see next to make two more blocks.... Cool.

Wait, what?...... aren't these blocks EXACTLY the same?!
Technically, yes..... but for whatever reason the FABRICS/colors used are not the same.
If you are super particular and want to follow the pattern exactly, follow the instructions provided on the TWO SEPERATE patterns to identify the different fabrics used.
If not, who cares..... cut four blocks from the first pattern set using whatever colors you want for the little floating triangle geese guys and let's move on!

Note: You DO really want the bottoms of these blocks to be the red and black... You'll see in a minute why.

Great, good talk.... So make the blocks, flying geese, half square triangles... etc. You guys are pro's now, remember!
We now... officially have.... (drumroll, please)
ALL of our blocks necessary to complete the top!!!! (I seriously need a confetti cannon)
🎉🎉🎉🎉🎉
that'll have to do I guess....
Anyway, you can now see what the center will look like!
Here are all the blocks up on my board... You see why the red in the middle was so important???
Note: Don't start sewing these together quite yet.... I just wanted to show you a taste of what it will look like.... We are going to sew the blocks together in rows.

Wait...... those can't be the same blocks... They don't look even remotely the same!
.................
Look again! I usually have to turn my head to one side to see it, but they are all there! They are all turned a bit wonky, but that's so we can set them in on point!!
Don't panic, it's EXACTLY like sewing straight rows.... well.... sorta.
Ok... Begin by cutting out your setting triangles as instructed.... the black ones.
We are going to start with the corners. Everything on point revolves around the corners.... Basically, you need to add the necessary materials to create straight rows to sew... See, I told ya... exactly the same! Ha Ha....
Note: Your pattern provides EXACT placement for every single basket... If you kept track of which one you made in what month.
If you didn't, again.... who cares?!.... place them wherever you want! It's a really scrappy quilt. I personally do not feel like it will matter at all!

So here's the corner..... but to figure out what to sew, let's turn our heads a bit to locate the rows.

Do you see it now???
Two baskets on their sides, triangles on either side.
A triangle, a basket, two setting blocks, a basket, a triangle.
Ok, assemble your little rows... but before you put the rows together, make sure you are lining them up working from the center, out... Meaning, find the seams that need to go together and line those up first. (you could even pin them!) DO NOT start sewing if the black triangle on the edge is not hanging over by at least a quarter of an inch!!!
This will indicate a problem. Either you aren't lined up right, or your triangle could be cut wrong.
(no worries, right!? This is just like the way we pieced our baskets.)
We are going to make only two of our corners this way... you'll see why.
If you lose your rows, just turn your head a bit....

We currently have top left, and bottom right done.... yes!
Ok... now is when it got a little tricky for me. The rows are HUGE! I couldn't fit them on my board anymore, so I started to lay them on my bed.
Be sure as you are going along to pay attention to which block is where... or... not! It's a sampler. No one will know but you if one is out of place, right?!
The only ones that matter are the red/beige blocks from month 2 and 3... These HAVE to be turned the right way or you will lose the effect... and also, the center blocks... Those kinda make the whole center pop!
The pattern... in black and white... shows the "lines" for the red/beige blocks. DON'T FOLLOW THE LINES ON THE PATTERN!!!
Instead, look at your colors and make sure the red will be to the outside, and the beige to the center.
Alright, so refer to your original photo for block placement and lay them out in rows.
Keep building out from the two corners we've made.
Remember to line up our seams from the center of the rows, out.

Here they are laid out on my bed... Maple keeping watch in case anything hits the floor and needs to be kept warm... 😏😆
I worked this in 3 main sections. Top left, and bottom right as shown above, and the middle.
Ok... so as you are building the middle section, you will come to a point where your "row" is not entirely complete. There just isn't a way to sew the last black triangle on to the right!
You have reached the "middle"
This is the point where you will need to add the top right triangle and bottom left triangle AFTER your rows are sewn together.
I know it's a bear... I know there is a TON of material to move.... It really helps to have a table or chair set up to the left of your machine to help "hold" all the extra materials you are pushing through.
Hang in there... you are almost done!!

After your three "sections" are together all you have left to do is borders and you're done!!!!
I ended up with a bit extra on the border fabrics, so I opted to cut my side borders a bit wider than the top and bottom. I don't think it changed the look at all... just made it a bit wider. Mine finished at 98" wide instead of 95"
Here's what I cut:
from the red: (5) at 2" for top and bottom (6) at 3" for the sides
from the black: (5) at 3.75" for top and bottom, (6) at 5.25 for the sides.
These measurements were based on what I had left over to use.... Feel free to make your strips wider if you'd like, but be sure to allow yourself enough fabric for your binding!!!
We do still have plenty of the black fabric available HERE if you would like to alter the borders wider than what it calls for... or wider than what you have left to use.

It's a big one!!! it barely fit on my wall.... Lol... It's going to look great on your bed though!!!!
Congratulations!!! Give yourself a pat... or a high five... YOU DID IT!!!
total pieces sewn this month: 253
total pieces in the ENTIRE quilt: 1,526!!!
I didn't count the borders as pieces... so technically, there's 1,526 in the center alone....
still impressive though!!!
total waste HST's collected in this project: 256... and the 8 big guys, remember?
WOW!!! That's a lot of pieces!!! Go you!!
(again... we really need confetti!)

Then added some of the bigger guys... and some more squares

and more big guys and squares...

Here it is!
This is my block... I call it the circular saw blade.
In my mind it seems to be spinning.... or maybe that's just my head spinning from all those pieces in that quilt top!

I have a bunch of these made up.... so don't worry... A pattern will be coming for a nice throw made of these!still impressive though!!!
total waste HST's collected in this project: 256... and the 8 big guys, remember?
WOW!!! That's a lot of pieces!!! Go you!!
(again... we really need confetti!)
Alrighty... A Final note about Waste Triangles:
If you started at the the beginning, you should have quite a pile of triangles to play with now!
We've gone over lots of little things you can make to use them... Really, you can use them for almost anything! They make a fast, cute gift idea last minute, or you can save them until you have enough for a whole quilt top... eventually. It's up to you!
So here's what I did with the big guys though....
Well.... I actually started with some little guys... and some squares and rectangles.

Then added some of the bigger guys... and some more squares

and more big guys and squares...

Here it is!
This is my block... I call it the circular saw blade.
In my mind it seems to be spinning.... or maybe that's just my head spinning from all those pieces in that quilt top!

If you are looking to use your left over scraps from this project, I hope you will consider my pattern!
There is also, a project called "Wagon Ruts" that is included with your pattern set. That would be a great option too!!
I hope I've encouraged you all to play with your triangles though... Use different sizes! Add some squares! Try adding Rectangles!!! You just never know what kind of cool block you can come up with!
Thanks for following along. I hope this was a help to you guys through your project.
And I hope you enjoyed following as much as I enjoyed this project!!!!Leave me a comment and let me know how I did on my first build along... AND SHOW ME SOME PHOTOS OF YOUR QUILTS!!!!
If you haven't already, follow us on Facebook HERE for more tips and ideas from Your Quilt Shop.
Thanks, guys.. It truly has been a pleasure!
No comments:
Post a Comment